Image Library
The Image Library is the v1.2 workspace for reviewing images after capture or import.
Open it from the Images dashboard and select the Library tab.
What It Is For
Use the Image Library when you need to answer practical questions about your captured or imported image subs:
- Which frames are linked to this target or imaging goal?
- Which files are missing locally?
- Which accepted frames are good enough to keep?
- Which images can be recalculated, regraded, calibrated, moved, or deleted?
- Which captures have a full-quality image available in Cloud Service?
The library combines several image sources:
Local library imagesimported from a configured working directoryTarget capturesreceived from N.I.N.A. and linked to scheduled targetsCloud-backed captureswhose full-quality image is available through Cloud ServiceCloud-only captureswhere the local file is missing but AstroManager still has a full-quality cloud imageMastersfor local calibration-library review
Workspace Layout
The Library workspace has three main layers:
- Choose the content mode.
- Find the images you want to review.
- Open a focused image and use the detail tools.
Content Modes
At the top of the Library workspace, choose between Lights and Masters.
Lights shows normal capture frames and is the main review mode.
Masters shows calibration-master related library entries when you are organizing local calibration data.
Review Views
For light frames, the library offers two view modes:
Groupsgroups images by target, imaging goal, filter, status, grade, or other review context.Compactshows a denser table-like review view with configurable columns.
Use Groups when you are cleaning up a project or target. Use Compact when you want to sort and compare many individual frames quickly.
Find Images
The filter panel narrows the library before you select or inspect anything.
Use text search for file name, target, camera, or grade text.
Use structured filters for:
- client, observatory, equipment, and filter
- linked-only, accepted-only, selected-only, or non-calibration frames
- source availability, such as local-only, full-quality cloud, preview-only, or missing local files
- quality metrics such as HFR, star count, eccentricity, and median ADU
Presets jump into common review setups, including recent imports and quality review.
Saved quick filters are useful when you often review the same client, storage location, or target family.
Select And Act On Rows
Select one or more rows and open Actions for bulk work.
Available actions depend on the selected rows:
Select Filteredselects all rows currently matching the active filters.Re-sync Missing Pathstries to reconnect library entries whose local file path is missing.Re-sync Missing Paths To Selected Storagesearches inside the selected storage root.Move Selected To Storage Structuremoves existing files into the configured storage path structure.Prepare Selected For Reimportremoves the selected AstroManager library entries while keeping files on disk.Create Missing Target Capturescreates target-capture records for linked library images that do not have them yet.Calibrate Selectedapplies matching local masters where possible.Recalculate Metricsrecalculates image metrics for eligible captures.Regrade Linked Capturesapplies the active grading configuration again.Delete Selected From Diskremoves selected local files from disk.
Warning
Prepare Selected For Reimport only removes AstroManager library entries. Delete Selected From Disk deletes local files. Use the second action only after checking the selected count and storage location.
Inspect One Image
Open an image row to inspect the preview, capture metadata, target assignment, grade, and available metrics.
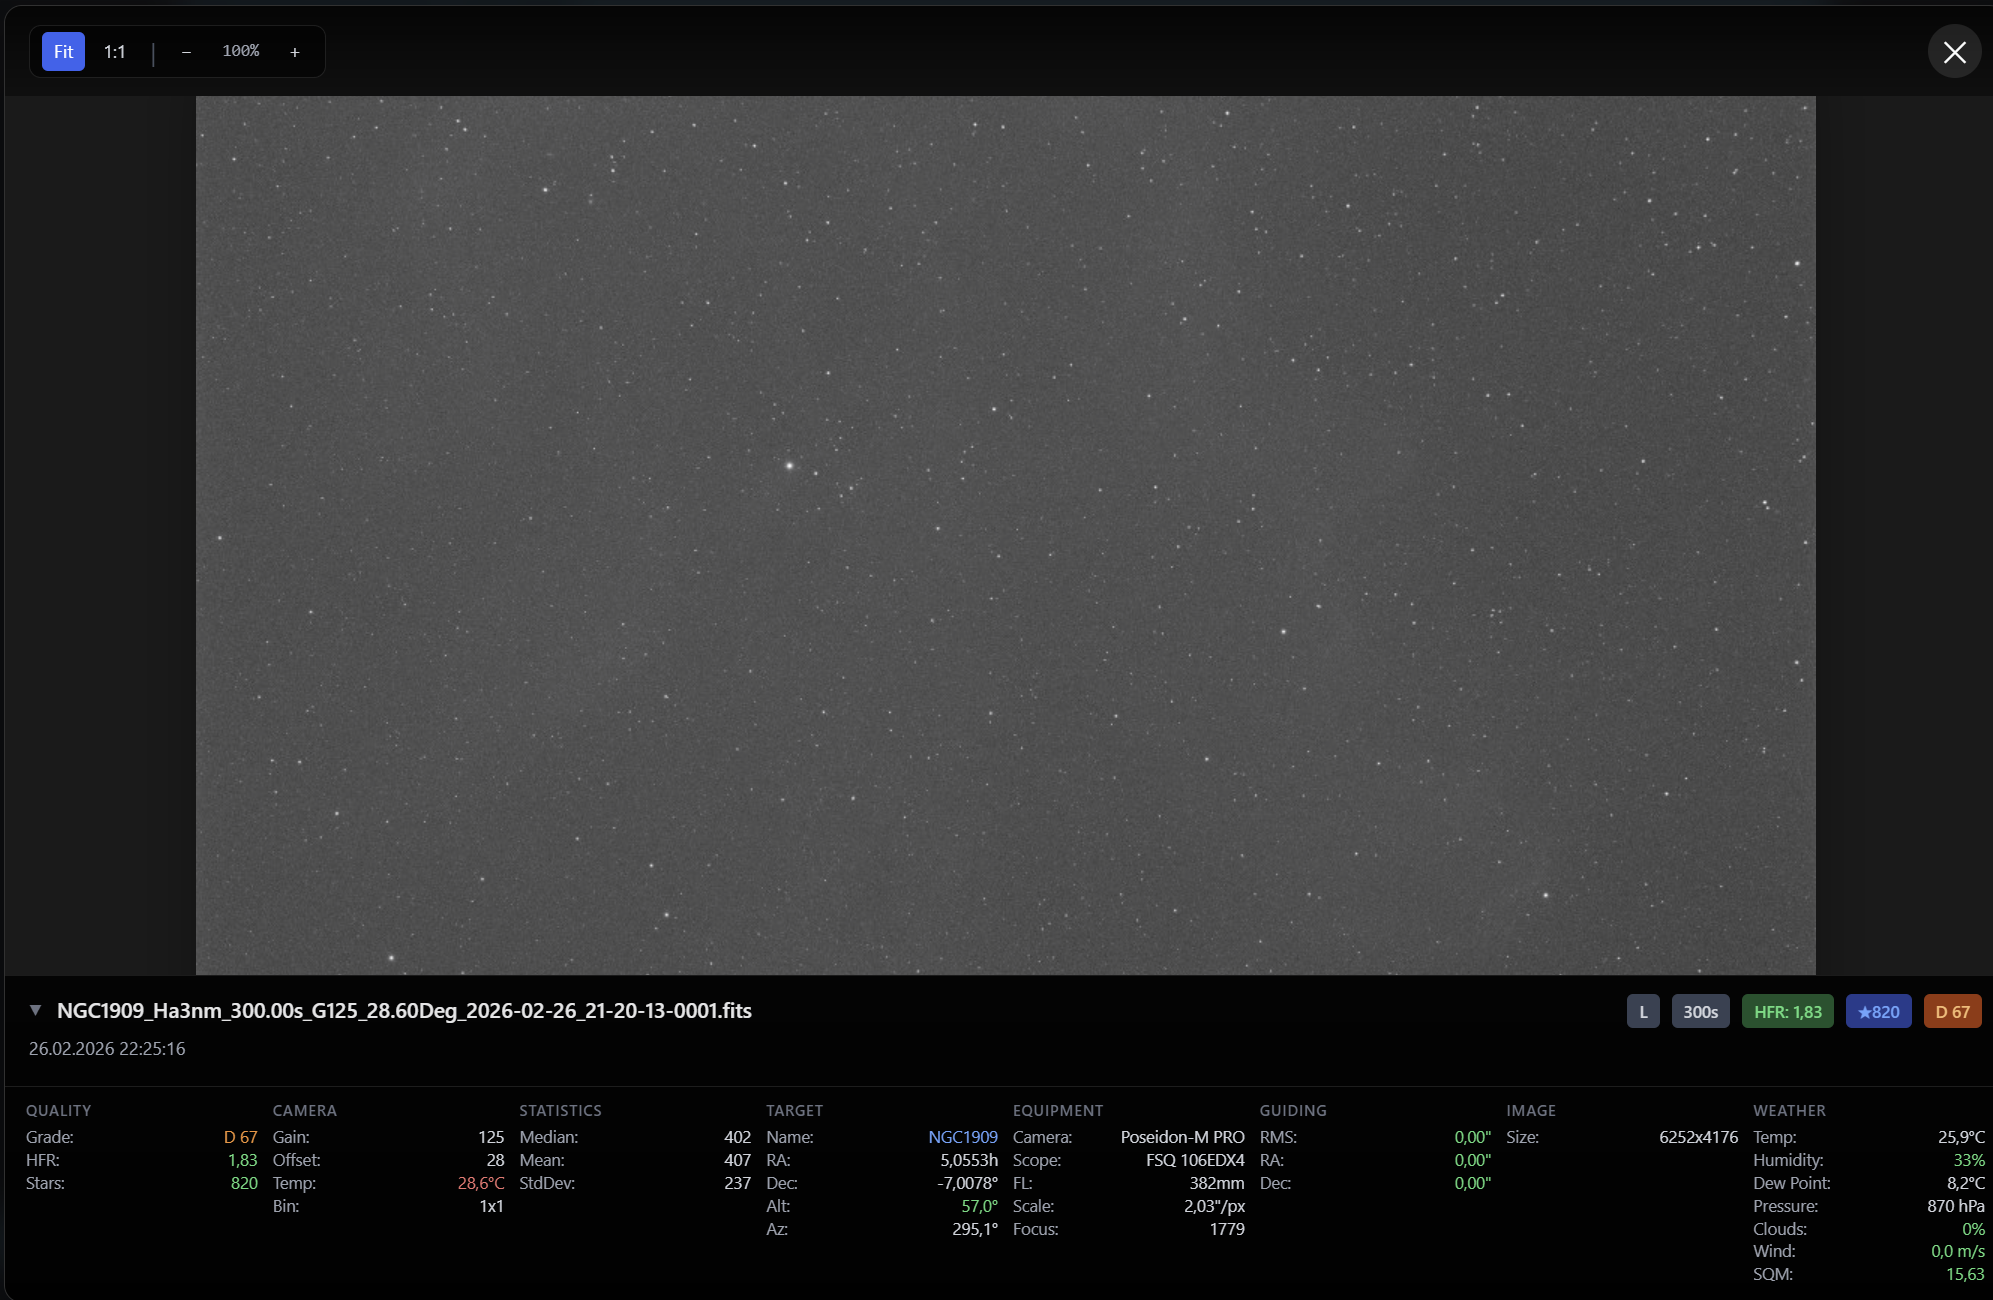
Depending on the image source, details can include:
- capture time, exposure, filter, gain, offset, binning, and temperature
- target and imaging-goal assignment
- HFR, star count, eccentricity, median ADU, and grading result
- local path and whether Cloud Service has a full-quality image or preview-only data
- camera, telescope, focal length, pixel scale, and image size
- weather and guiding data when the capture record contains it
Image Detail Tools
The focused image detail area is the main place to inspect an image.
The available tool tabs are:
Image: opens the interactive image viewer.Curvature: shows field curvature and field-shape diagnostics from detected stars.Metrics: shows review metrics and can recalculate them when the image source is available.Platesolve: shows WCS / coordinate status and can re-platesolve through ASTAP when possible.Manage: used for image-management actions when they are available for the selected row.
Not every tab can do work for every image. Some tools need a local file or a downloadable full-quality cloud source. If AstroManager only has a thumbnail or stored preview, download or re-sync the source first.
Image Tab
The Image tab contains the viewer, preview controls, live inspect, detected-star overlay, and compare tools.
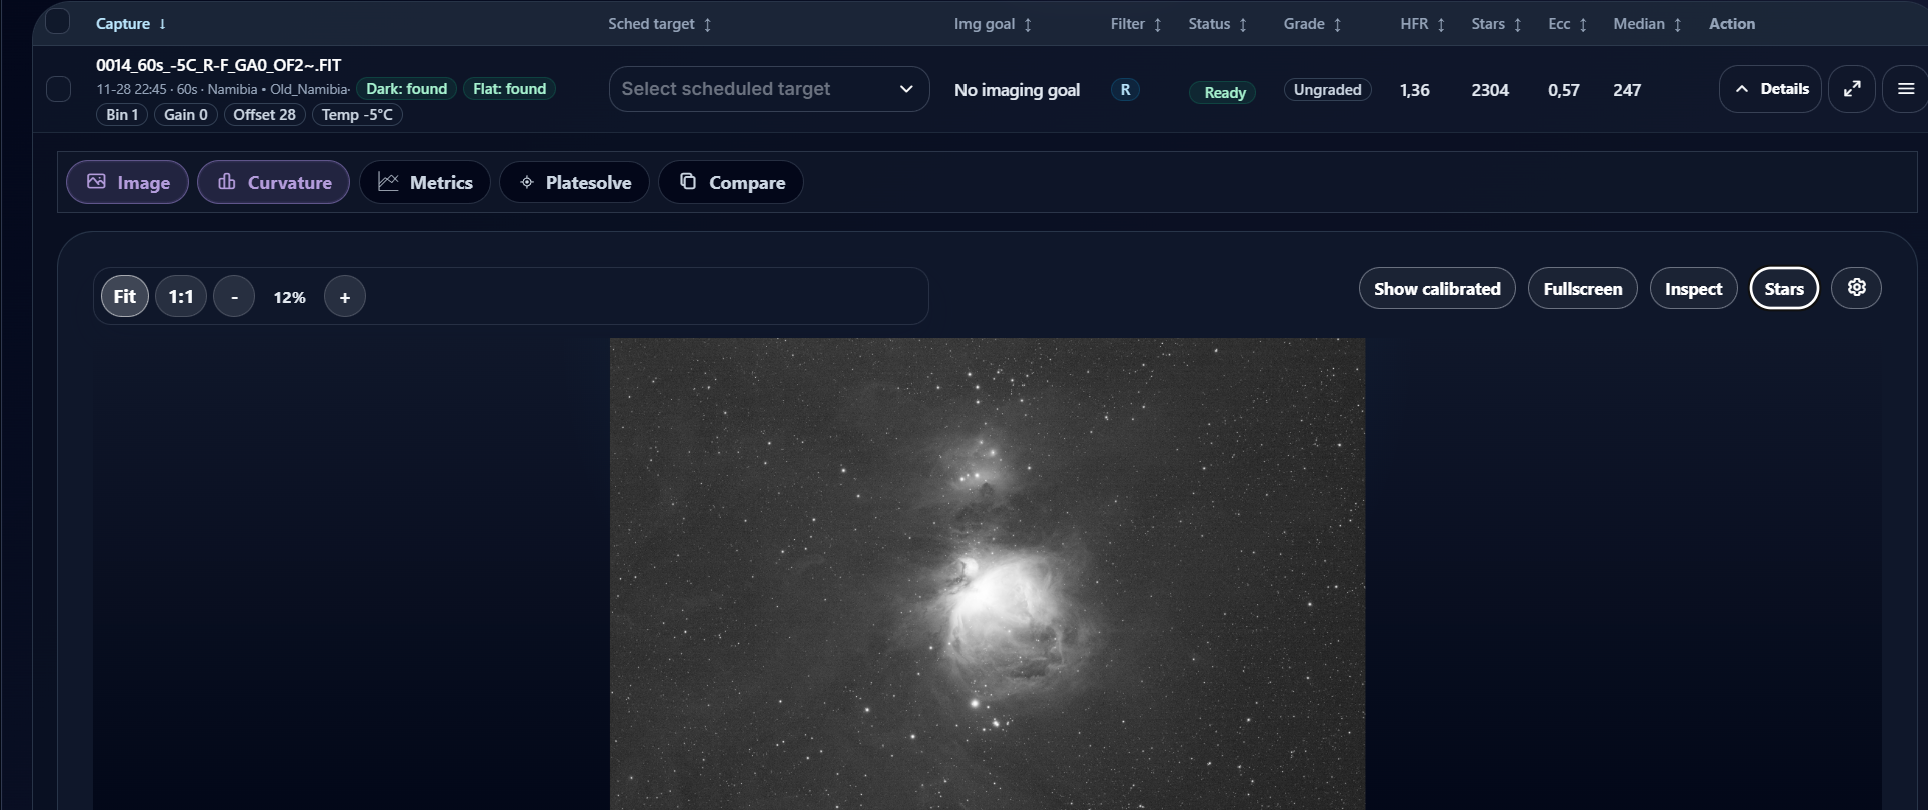
The same viewer is used across the Image Library, Image Import review, and Integration Previews.
Navigation
Use the top controls for navigation and display:
Fit: fits the full frame into the available viewer area.1:1: shows the frame at pixel-level scale when the source supports it.-/+: zoom out and in.- Drag the image when zoomed in to pan around the frame.
- Hold
Shiftand use the mouse wheel to zoom around the cursor. Fullscreen: opens the focused image in a larger viewer.
Image Versions And Compare
When multiple versions are available, the viewer can show extra buttons such as:
Preferred/Calibrated: show the best available working version.Original: show the uncalibrated/source image sub.Compare: enable a side-by-side swipe comparison.
When compare mode is active, use Swipe compare to move the split line. In preview settings, Rotate compare 180° helps when the comparison source is rotated relative to the current view.
Preview Settings
Open the settings button in the image viewer to control how the image is rendered.
Important settings are:
Auto stretch: turns the preview stretch on or off.Preview quality: switches betweenHighandFullquality where full data is available.Stretch profile: chooseStandardorAggressive.Fine tune stretch: opens sliders forBlack point,White point, andMidtones.
Use Standard for normal review. Use Aggressive when you need to reveal very faint structure quickly. Use fine tuning when the automatic stretch hides gradients, clips highlights, or makes the background too bright.
Live Inspect And Inspect Grid
Inspect switches the viewer into a 3 x 3 close-up grid covering the frame corners, edges, and center. This is the fastest way to compare star shape across the whole field.
In normal image mode, the live inspect loupe is available when raw pixel data can be loaded:
- right-click and move over the image to show a close-up panel
- the panel shows the inspected pixel position and raw value
- use
AltorCtrlwith the mouse wheel to change inspect magnification - use
Shiftwith the mouse wheel to resize the inspect panel
Use live inspect for quick checks such as focus, star shape, clipping, small tracking errors, or whether a metric outlier is visible in the actual frame.
Stars Overlay
When detected-star data is available, the Stars button overlays the stars used for metric calculation.
Use this when you want to understand where HFR, eccentricity, or field-shape values came from. Hover a star marker to see its label.
Curvature Tab
The Curvature tab summarizes field shape across the frame. Use it when you are checking corner quality, tilt-like patterns, or whether one side of the frame is consistently worse.
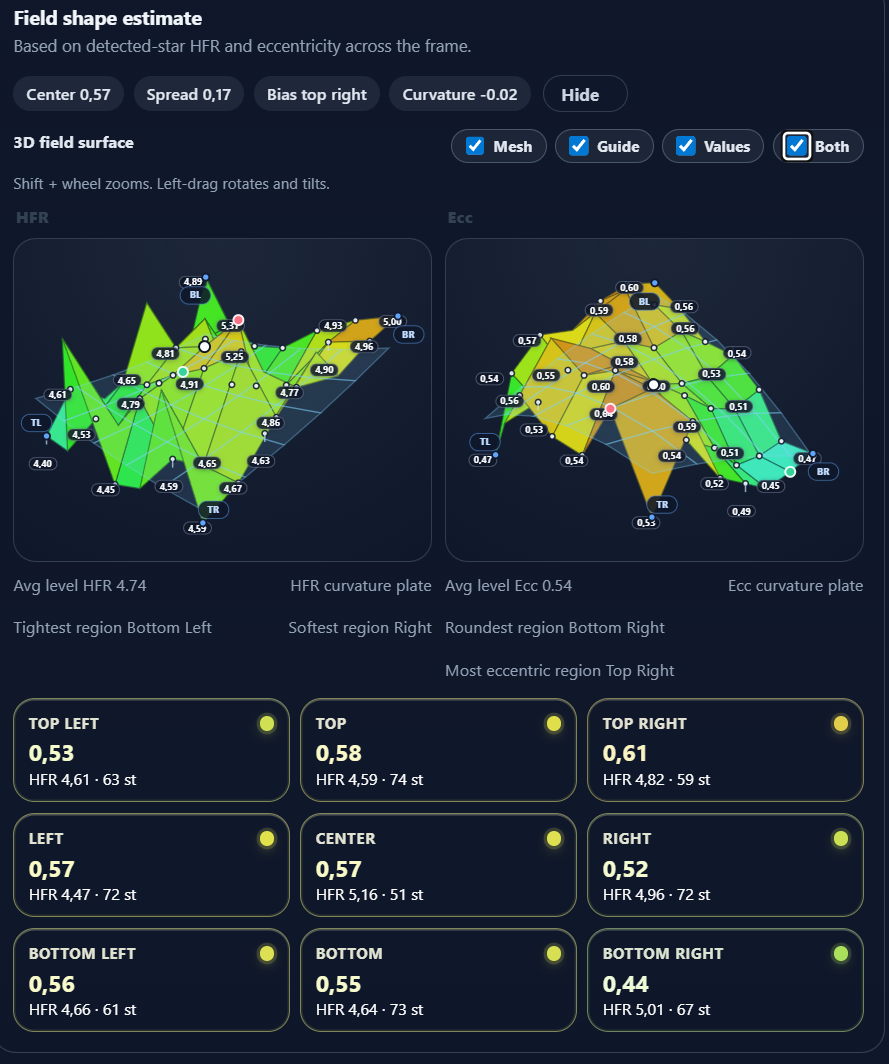
The curvature tool includes:
- center, spread, bias, and curvature summary values
- a field heatmap split across the frame
- a 3D surface plot for HFR or eccentricity
- a
Metricswitch betweenHFRandEcc - surface settings for
Mesh,Guide,Values, andBoth Refresh diagnosticswhen the image source can be analyzed again
In the 3D plot, left-drag rotates or tilts the surface. Hold Shift and use the mouse wheel to adjust the plot zoom.
Use this tool to spot uneven field quality, tilt-like patterns, corner problems, or a side of the image that is consistently worse than the rest.
Metrics Tab
The Metrics tab shows the values AstroManager uses for review and grading, such as HFR, star count, eccentricity, median ADU, background values, grade, and related computed fields.
Use Recalculate when:
- the image was imported before metrics existed
- a source file became available after being missing
- you changed or repaired metadata
- you want the current metrics written back into the AstroManager record and supported FITS headers
After recalculation, you may also want to run Regrade Linked Captures.
Platesolve Tab
The Platesolve tab shows whether the frame has usable solved coordinates.
It displays:
- solve status message
- RA
- Dec
- PA / rotation
Use Re-platesolve when the image has no WCS data, the target assignment looks suspicious, or imported data needs verified coordinates. ASTAP must be available on the machine doing the solve.
Manage Tab
Individual rows also have image actions. The exact list depends on the row state and available source data.
Common actions include:
- copy file name or full path
- download a full-quality cloud image to local storage
- edit supported FITS headers
- refresh diagnostics
- recalculate metrics
- grade or regrade the image
- plate solve
- calibrate with matching masters
- re-sync missing local paths
- edit assignment or storage where supported
- delete a local original
- register a calibration master
- preload or blink frames for fast comparison
Troubleshooting
If images are missing from the library, check that the folder was imported or that the client has synced captures.
If a row shows a missing local path, use Re-sync Missing Paths or open the library from the relevant storage root.
If cloud actions are unavailable, check the Cloud Service quota and whether the target has full-quality cloud uploads enabled.
If grades look stale, select the affected rows and run Regrade Linked Captures.
If the viewer only shows a thumbnail or preview-only data, the full image source is not available yet. Re-sync the local path or download the full-quality cloud image to local storage.
If curvature, metrics, or platesolve tools are disabled, AstroManager needs access to the local file or a full-quality cloud image first.